
Arduino speaking variometer
These are my backup project notes - please email me if interested
Objective
Build a helmet mounted variometer for paragliding that speaks
the altitude above take-off in feet and the minutes since the flight began
Part 1 - Driving the speaking chip WTv020sd16 from an Arduino Nano
Method
This board seems to present many problems to get it to speak sound files - but it is very cheap!
Files are saved on a micro SD card.
Links
main debate
more debate
buy one for about £3
SparkFun version
WTV020_manual_V1.3.pdf
Some observations
1) You need >3.5V for the SD card on the module from a source that can give 100mA while it talks without dropping out.
- This is because the SD card cannot run on just 3.3 volts - but the board is designed for 3.3 volts - do not use 5 Volts!!
2) WAV files play OK. I have a set of numbers that are very clear.
3) NB! as delivered 2 of the pins were dry solder jointed to the card!!!!! - I scratched off the paint round the pin and resoldered
4) An old Sandisk 2GB worked for a while off the Arduino 3V - after a few days it stopped
5) New identical Sandisks also failed on the Arduino supply - but all OK now on a dedicated more powerful supply
6) A Kingston 2GB failed on any power supply - people say it is very hit and miss but genuine Sandisk are always OK
The board demands 100 mA at 3.55 volts so I use an LM350 variable supply with 6.5 volts in and 3.55 volts out.
- I have 120 ohms across pins 1 and 2 and 227 ohms from pin 1 to earth (on a 350 ohm variable potentiometer).
On a 'scope it is rock solid 3.55 volts. At a bit below 3.4 volts the board stops talking.
I record WAV files of my voice in Audacity on my Mac and then amplify them to the default maximum without clipping
(to do this select the word you need from your voice recording at - MONO 8000Hz 16bit
- save selection as wav - re-open the saved wav file - click "effect - amplify" and choose the default no clipping maximum setting - re-save)
I see no need to bother with the manufacturers special file system (.ad4 files and the Somo tool)
My sound files on the SD Card (FAT16 format)
Circuit
I only use A1 to drive the data pin and A0 to drive the clock pin
I need to modify
Wtv020sd16p.h if I need to use A2 and A3 for other reasons
My first test sketch
/* #include <Wtv020sd16p.h> int resetPin = A2; // The pin number of the reset pin (not needed here - kill in .h file?) /* void setup() { void loop() Serial.print("currentMillis = "); Serial.println(currentMillis); void say_sound_file_function(int number_to_speak) } |
20/09/2013 - Work in progress - Lesson 1 quality code!
I can now run a first attempt sketch that speaks the height and says how many minutes the sketch has been running
I will use the buttons OK/UP/DOWN to make a talking menu to adjust the variables.
NB there is something wrong with the pressure to height calculation - I need to lift the sensor about 3 feet for it to change by 1 foot.
// original code by Rolf R Bakke, Oct 2012 /* (1 meter = 3.2808399 feet) Wtv020sd16p speaks the height as alt_rounded digit by digit int resetPin = A2; // The pin number of the reset pin (not needed here - kill in .cpp file?) // set up the OK/UP/DOWN buttons (D8/D7/D6 wired to 5V, press for 0V)) // variable for reading the pushbutton status const float p0 = 101325; // Pressure at sea level (Pa) const byte led = 13; float toneFreq, toneFreqLowpass, pressure, lowpassFast, lowpassSlow, lowpassVerySlow ; int ddsAcc; //>>>>>>>>>>>>>>>>>>>>>>>>>>>>>>>>>>>>>>>>>>>>>>>>>>>>>>>>>>>>>>>>>>>>>>>>>>>>>>>>>>>>>>>>>>>>>>>>>>>>>>>>>>> SETUP START // use i2c setupSensor(); //>>>>>>>>>>>>>>>>>>>>>>>>>>>>>>>>>>>>>>>>>>>>>>>>>>>>>>>>>>>>>>>>>>>>>>>>>>>>>>>>>>>>>>>>>>>>>>>>>>>>>>>>>>> SETUP END
//§§§§§§§§§§§§§§§§§§§§§§§§§§§§§§§§§§§§§§§§§§§§§§§§§§§§§§§§§§§§§§§§§§§§§§§§§§§§§§§§§§§§§§§§§§§§§§§§§§§§§§§§§§§ MAIN LOOP START //````````````````````````````````````````````````````````````````````````````````````````````````` altitude / time speaking start // announce "feet" coming next minute = millis()/60000; //or use 120000 for speaking the minutes every 2 minutes etc Serial.print("currentMillis = "); Serial.println(currentMillis); time += 20; //*************************************************************************************************calculate altitude from pressure start Serial.print("Altitude: "); // round the altitude to the nearest whole number // ++++++++++++++++++++++++++++++++++++++++++++++++++++++++++++++++++++++++++++++++++++++++++++++ use WTV20SD to speak numbers start // feed the characters that make up the string one by one to the speaking chip //%%%%%%%%%%%%%%%%%%%%%%%%%%%%%%%%%%%%%%%%%%%%%%%%%%%%%%%%%%%%%%%%%%%%%%%%%%%%%%%%%%%%%%%%%%%%%%%%%%%%%% original Bakke vario code start dT = D2 - ((long)calibrationData[5] << 8); long getData(byte command, byte del) void setupSensor() twiSendCommand(0x77, 0xa0 + i * 2); void twiSendCommand(byte address, byte command) void ledOn() void ledOff() |
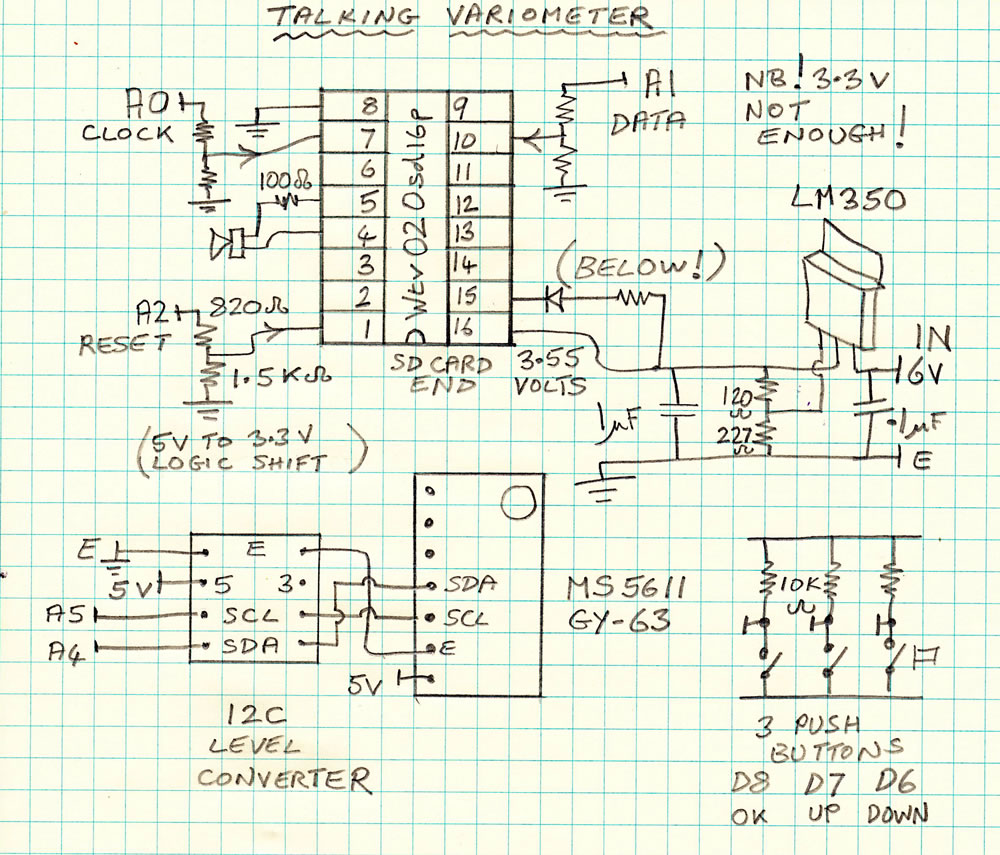
I believe the 12c level converter is not needed - there is one on the vario board - will test soon .
The push buttons will be used to respond to a spoken menu - there will be a slide switch on the power line and a menu will be offered at re-start.
Comments? email me